The Coelacanth typeface I’m creating is classic Venetian style, harking back to an age before bold type was invented. Bruce Rogers didn’t create a bold for Centaur (on which Coelacanth is based), but we now live in an age of philistines, and bold type is ubiquitous. I’d like Coelacanth to be versatile and meet all the common typesetting needs; so it must have bold.
Start with extremes
To produce the complete Coelacanth family I’m relying heavily on interpolation. So rather than start by working on a “bold”, I’m beginning with a “heavy” which is much more exaggerated. The bold can then be produced by interpolation, along with semi-bold, etc.
Starting with extremes is generally a good idea, because if you can get it looking fairly good at an extreme weight it should look excellent by the time you’ve interpolated it back towards your carefully-designed regular. There are limits, and if you start too extreme you’ll be tempted to deform the letter-shapes substantially, so your counters don’t disappear… but those deformations aren’t a good basis for interpolation. So start as extreme as you can without losing the basic shapes of the glyphs.
How does one make a bold?
Creating a good bold by manually dragging nodes is beyond me. Perhaps I might eventually end up with something that looked halfway OK, but would it still have the distinctive look of the Coelacanth family? Unlikely.
Instead, I have tried several semi-automated approaches, to get close to what I want. One of these is easy, but the others take considerable time and care. Hey, you want to design fonts? It comes with the territory.
FontForge’s “Change Weight” function
It may be the naïve approach, a mindless algorithm that expert typographers would spurn… but I’d be stupid not to at least try it.


A few clicks: Element > Styles > Change Weight; I set it to embolden by 50 units and “squish” counters; set it to “LCG” (Latin, Cyrillic and Greek mode). By getting it to “squish”, you’re telling it not to deform the shape in order to give the counters room. We don’t want to go so extreme that that’s necessary. (Note: I’m not changing the advance widths so far.)
Well, it’s certainly bolder. To use this you’d need to clean up all the new nodes that have appeared. Most of these will disappear fairly cleanly if you select them and hit Ctrl-M (for merge), but you may have to do some manual repositioning in a few cases. Also note that the first node of each contour is now in a different place; that will cause problems for interpolation. Ctrl-1 will make a selected node the first node of that contour, but your troubles are not over: although the interface gives no clue of this, the contours are now in a different order. Very tricky. If you try to interpolate now you’ll get something like this:

The easiest way to correct this is through judiciously cutting and re-pasting contours in one glyph until you find the right order. You can also enable View > Number Points > SVG, which removes all doubt but clutters the screen.
So… the strokes in this auto-generated bold don’t have as much contrast between thick and thin as I’d like. The characters have a sausagey feel, lacking grace. If you look at other well-designed bolds you’ll see that the thin strokes and serifs remain fairly thin, not like this. Time to try something else.
How are letters formed?
To get a really decent bold we need to think a bit about how the letter is formed. Classical serif typefaces are designed to emulate the strokes of a broad-nib pen or brush. The thick and thin parts of the strokes result from the angle of the pen nib, as you can see.


What we really want is a way to simulate a wider nib: i.e., to broaden the strokes along the pen’s nib angle, but not in the other direction.
The g glyph is a special case, because the nib angle changes so much between the top and bottom of the glyph. In many other glyphs the pen keeps a fairly constant angle except at the serifs (books on calligraphy show how serifs are constructed, for those who are interested).
So leaving the lower-case g aside for the time being, I tried a different method.
Escalate, embolden, de-escalate
For my next experiment I started from the 60pt optical version of Coelacanth, reasoning that if I could get it right here, where small mistakes would be so obvious, I might be able to automatically apply the same changes to smaller optical sizes, using some interpolation trickery. Anyway, here’s the experiment.

- Rotate each glyph 15° clockwise and then scale X 100% Y 2000%. This is all done relative to the glyph origin. This gives monstrous letters, 20 times their original height on a rotated axis.
- Embolden by 50 units, squishing counters (as above).
- Scale the result X 100% Y 5% and rotate 15° counter-clockwise.
Note that 15° is the angle I figured the “pen nib” was “held” at when drawing most glyphs: you can see this most clearly in the O glyph. By stretching each character perpendicular to that angle before bolding it, I ensured that the final result would only be bolded by a small amount in that direction.
But we’re not finished. Move the new auto-bolded glyph to the background layer and copy the original, regular version of the glyph into the foreground. Now manually adjust all the nodes using the background as a rough guide. Try to keep the thinnest strokes as thin as in the original. Don’t slavishly match the width of every stroke—it works for many characters but not for all; for instance, the left stroke of the A will probably need to be much thinner than the auto-bolded result (and remember odd cases like the g). Also, avoid making the tips of the serifs any thicker.


Here are some other letters:


The letters I eventually arrived at through this approach were pleasing enough that I created the entire upper- and lower-case alphabets this way… but when I viewed runs of text, I couldn’t escape the feeling that I had lost some of the playfulness of the regular weight.

There was a strong variation in stroke thickness, true, but it lacked the dynamism of the original. Thick strokes tended to be fairly uniformly thick, thin strokes thin; it was like loud or soft with nothing in between. And the monotonous 15° nib angle became a bit invasive in longer runs of text. These letters weren’t terrible, but they didn’t quite fit the Coelacanth family.
Turning things on their head

I had another idea, a little crazy. If I wanted to match the subtle thick-and-thin dynamics of the regular, I could do so by extrapolation… by starting with glyphs whose strokes had no thickness at all! Extrapolate these through regular by, say, 200%, and you arrive at strokes that have exactly the same dynamics as the regular, only twice as thick. The thin strokes would become a little thicker, and the fat strokes would get really phat…
So began the strange process of producing a zero-weight font.
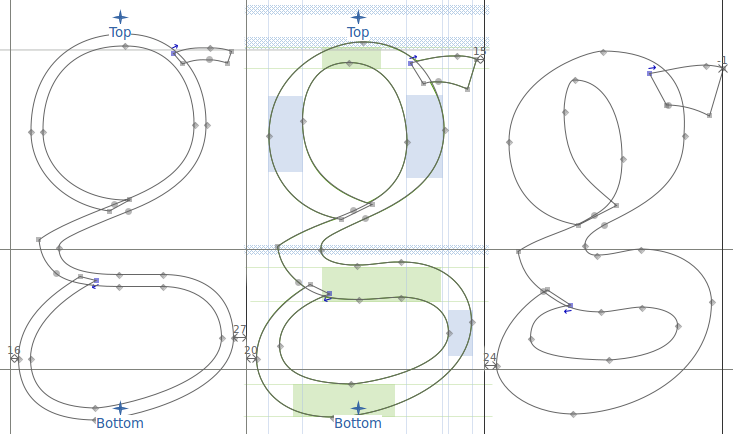
The new font, which I called “Coelacanth Wireframe”, was manually created by moving nodes from each side of the stroke until they met in the middle. Well, actually, not the middle. If the wireframe strokes ran exactly along the middle of the regular strokes, then the resulting bold was going to puff out equally on all sides. I wanted to keep the advance width for each character the same (initially at least, until I knew better what I was doing), and I also wanted the exterior contours of circular glyphs such as O and o to remain circular. If any contour was going to be squished it should be the internal one.
To produce the wireframe I started by shifting the sides of the outermost contour inwards (left or right) about 12 units, and the top and bottom inwards (down or up) about 6 units. The rest was guesswork and ingenuity, staying alert to where these strokes were likely to land once they were bolded, and what might get in their way. FontForge has an editing option called “Interpolate CPs on Motion”, which makes the process rather easier, though it’s still time-consuming.


And note that the wireframe isn’t perfectly without thickness. If you zoom right in you’ll find it’s rough in spots, but that’s good enough for council work, as they say.
The result is this; before clean-up on the left; after clean-up on the right. The contours are much more faithful to the dynamism of the regular.
 The text on the right shows our new heavy weight at the top, and beneath it a “bold” produced by interpolating the heavy with regular. I find this much more successful than the previous attempts, and yet… it looks too stolid and heavy. The thin strokes have ballooned too much and it just doesn’t have the contrast I’d hoped for. The serifs are too fat, as well. It’s better than FontForge’s automatic bold, but still too sausagey for my liking.
Extrapolating from a hairline

The problem is, in our new heavy weight, everything has doubled in thickness. The thin lines are twice as fat; so are the serifs. We don’t want that; we want them to keep their fineness. The solution is to extrapolate not from a wireframe of zero thickness, but from a hairline font with uniformly thin strokes about as wide as the thinnest strokes in our regular.
That way, when we create our heavy weight, its thinnest features will be no thicker than in the regular, while other strokes will be much thicker.
To achieve this, I first measure the width of the thinnest commonly-occurring lines in the regular font. The cross-bar of the e is pretty thin, just 24 units. That’s the ‘hairsbreadth’ that I’m going to model this hairline font on. I start with the wireframe font.
- Apply FontForge’s Element > Expand Stroke function, setting stroke width and height to 24 units, and not checking “remove internal contour” or “remove external contour”. Expanding strokes on a glyph with contours that so closely coincide is confusing enough for FontForge, without asking it to remove internals.
- The result may be quite messy, but it’s just a guide. Copy the resulting contour to the background layer, then undo it in the foreground layer, so you’re back to the wireframe.
- Now manually adjust the nodes so that they follow the shape in the background. This can be fairly quick if you’ve constructed your original glyphs well, making good use of HVCurve nodes. HVCurve nodes can generally just be shifted left, right, up or down by half a hairsbreadth (in this case, 12 units), and apart from some very fine tweaks to their control nodes, you’re done. It’s certainly easier than making the wireframe.


So here’s what it looks like when we extrapolate a new heavy weight g from our hairline.
This is great. There’s heaps of contrast, and the lines still have their elegant fineness, but there’s real weight to them as well. The clean-up turns out to be much easier, since many parts of the character, including the fiddly serifs, aren’t being deformed that much. And it looks so good.
This isn’t a true simulation of widening the pen nib, but it’s a good enough approximation to fool me.
Future ideas
Did you notice how both times we tried to extrapolate our g (once from wireframe, once from hairline) the neck of the g ended up out unnecessarily long, and the lower-storey was a bit too squashed? Both times I had to clean these up. That indicates to me that the neck is too short in the wireframe and hairline fonts, and I could fix that. If I extrapolate back from the cleaned-up heavy 200% through regular, that’ll return me to something like the hairline, and I can use that as a model for reproportioning the hairline. I have an intuition that pleasing heavy contours and pleasing hairline contours should mirror each other. This could be important if I want to create attractive “light” weights of the typeface.
You may also have noticed that the extrapolation sometimes gives self-intersecting contours: look at where the ear of the g joins the upper bowl, for instance. The contour does a little internal squiggle and re-emerges. That happened both times I tried to extrapolate, and both times I cleaned it up. But perhaps I shouldn’t have. Self-intersecting glyphs are sometimes intentionally designed like that, because it facilitates better behaviour in stem connections during interpolation. A better design for my g might look roughly like this:

There’s another autobold function, called Expand Stroke… . This allows setting different emboldening values for two perpendicular angles. Make sure to select External only for outlines, and to preserve corners use Miter line join. Alternatively, the Change Weight… function can be used to do this by using a scaling beforehand, then scale back when finished.
Greetings!
I really love Coelacanth! I just downloaded the most recent version from here (I think it is the most recent!!). I have been looking for a bold-italic weight, the italics I have are “Italic” “ItalicCaption” “ItalicPearl” and “ItalicSubcaption” but none of them are particularly bold. Is there any hope of a bolder-italic at some point in the future?
Thank you so much for all you’ve done! (I also really like your Song of Songs translation!)
Thanks Marta! It’s all a matter of when I find time. I haven’t extended the italic into the larger optical sizes yet, nor have I created bold italic. It’s all on the roadmap but it’s been taking me a long time recently. It’s really gratifying, seeing people already getting good use out of Coelacanth, but I know there are some important features still missing!